The Thread Class
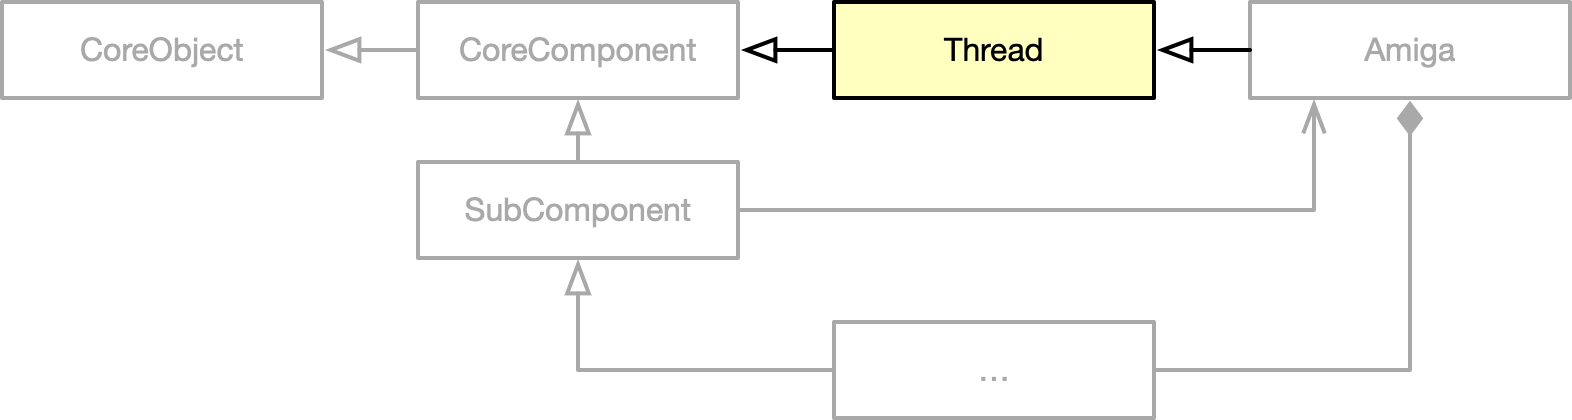
In this document we will take a closer look at the Thread class, which adds concurrent code execution capabilities to the Amiga class. In addition, it implements the state model of the emulator.
Creating an emulator instance comprises two steps:
Creating an instance of the
Amigaclass.Calling
Amiga::launch().
Inside Amiga::launch(), an emulator thread is spawned in the constructor:
Amiga::launch()
{
    ...
    thread = std::thread(&Thread::main, this);
    ...
}
The thread is never terminated. It remains alive until the application quits.
Main function
After the thread has been created, it starts executing the Thread::main function which is inherited from the Thread class. This function consists of a large while loop which looks like this:
void
Thread::main()
{
    ...
    while (++loopCounter) {

        if (isRunning()) {

            switch (getThreadMode()) {

                case THREAD_PERIODIC:   execute<THREAD_PERIODIC>(); break;
                case THREAD_PULSED:     execute<THREAD_PULSED>(); break;
                case THREAD_ADAPTIVE:   execute<THREAD_ADAPTIVE>(); break;
            }
        }

        if (!warpMode || !isRunning()) {

            switch (getThreadMode()) {

                case THREAD_PERIODIC:   sleep<THREAD_PERIODIC>(); break;
                case THREAD_PULSED:     sleep<THREAD_PULSED>(); break;
                case THREAD_ADAPTIVE:   sleep<THREAD_ADAPTIVE>(); break;
            }
        }

        if (stateChangeRequest.test()) {

            switchState(newState);
            stateChangeRequest.clear();
            stateChangeRequest.notify_one();

            if (state == EXEC_HALTED) return;
        }
        ...
    }
}
Because the thread is never terminated, the loop is executed during the entire lifetime of the application. Within the loop body, two switch-case blocks can be spotted. The first one is executed as long as the emulator is running and calls one of three possible functions, depending on the operation mode of the thread. Both functions emulate the Amiga for a single frame. The second switch-case block is executed when the emulator is not running in warp mode. Within this block, one of three synchronization functions is called, again depending on the selected operation mode. The purpose of these functions is to keep the thread running at the right pace. That is, they ensure that the functions are called 50 times per second for PAL machines and 60 times per second for NTSC machines.
Three synchronization modes are available: Periodic, Pulsed, and Adaptive.
enum_long(THREAD_MODE)
{
    THREAD_PERIODIC,
    THREAD_PULSED,
    THREAD_ADAPTIVE
};
typedef THREAD_MODE ThreadMode;
THREAD_PERIODIC:In periodic mode the thread puts itself to sleep and utilizes a timer to schedule a wakeup call. In this mode, no further action has to be taken by the GUI. This method had been the default mode used by vAmiga up to version 2.3.
THREAD_PULSEDIn pulsed mode, the thread waits for an external wake-up signal that has to be sent by the GUI. When the wake-up signal is received, a single frame is computed. vAmiga uses this mode to implement VSYNC.
THREAD_ADAPTIVE:In adaptive mode, the thread waits for an external wake-up signal just as it does in pulsed mode. When the wake-up signal comes in, the thread computes the number of missing frames based on the current time and the time the thread had been lauchen. Then it executes all missing frames or resynchronizes if the number of missing frames is way off. Adaptive mode has been introduced in vAmiga 2.4. It has become the new default mode since then.
State model
Let’s take a closer look at the isRunning() function, whose implementation is very straightforward:
bool isRunning() const override { return state == EXEC_RUNNING; }
The variable state may hold one of the following values:
EXEC_OFF: The emulator is turned off.EXEC_PAUSED: The emulator is turned on, but not running.EXEC_RUNNING: The emulator does its job. The virtual Amiga is alive.EXEC_SUSPENDED: The emulator is paused for a short period of time.EXEC_HALTED: The emulator is shutting down.
The following image provides a visual representation of the state model:
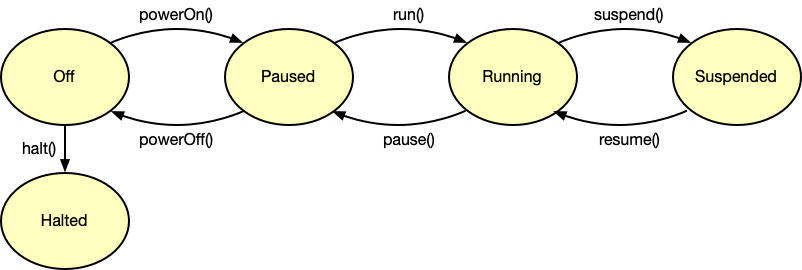
After creating an instance of the Amiga class the emulator is in OFF state. By calling the function powerOn() the emulator is put into PAUSED state. This is the same state that is entered when the user presses the Pause button in the toolbar. A call to run() brings the virtual Amiga to life by putting it into a RUNNING state.
The Thread class provides a suspend-resume mechanism that can be used to pause the thread for a short period of time. This functionality is frequently used by the graphical user interface to carry out atomic operations that cannot be performed while the emulator is running. Theoretically, the thread could also be put into PAUSED state for this purpose, but this would also stop audio. To avoid disruptions, a special SUSPENDED state has been added. In this state the execute function is no longer called, but other services, such as the audio playback, are kept alive.
The SUSPENDED state is entered by calling suspend() and exited by calling resume(). Critical code sections can be executed safely by embedding them in a suspend-resume block like this:
suspend();

// Change the internal state of the emulator as you like.

resume();
It is safe to nest multiple suspend-resume blocks, but it is essential that each call to suspend() is followed by a call to resume(). Consequently, the critical code section must not be exited in the middle, e.g. by throwing an exception. For this reason, you will often see the keyword SUSPENDED in the code, which is an exit-safe wrapper around suspend() and resume(). With this macro, the above code snippet can be rewritten as follows:
{   SUSPENDED

    // Change the internal state of the emulator as you like.
    // Feel free to return or throw an exception.
}
To speed up emulation, e.g. during disk accesses, the emulator may be put into warp mode, which is also handled by the Thread class. As you have seen in the code fragment of the Thread::main() function, neither of the two synchronization functions is called when warp mode is active.
Similar to warp mode, the emulator can be put into track mode. This mode is activated when the GUI debugger is opened and deactivated when the debugger is closed. In track mode, several time-consuming tasks are performed that are normally skipped. For example, the CPU keeps track of all executed instructions and stores the recorded information in a trace buffer.
The Thread class provides several API functions for changing state such as powerOn(), powerOff(), run(), pause() or halt(). These functions request the thread to change state by setting the following variable to true:
std::atomic_flag stateChangeRequest;
As you may have already seen in the code snippet above, the main function checks this variable in each iteration of the while loop and performs a state change when necessary. The implementation of function switchState looks like this:
    while (newState != state) {

        if (state == EXEC_OFF && newState == EXEC_PAUSED) {

            CoreComponent::powerOn();
            state = EXEC_PAUSED;

        } else if (state == EXEC_OFF && newState == EXEC_RUNNING) {

            CoreComponent::powerOn();
            state = EXEC_PAUSED;

        } ...

        } else if (newState == EXEC_HALTED) {

            CoreComponent::halt();
            state = EXEC_HALTED;
        }
    }